We are going to generate a Redux Store to handle the data coming from our Rating API. For the sake of simplicity, we have already created a SDK from the Swagger specification of the rating API. The package for this SDK has been deployed to our NPM registry.
In .yarnrc.yml file we already added the @flight-rating under npmScopes to be able to install the dependency.
npmScopes:
  ...
  flight-rating:
    npmRegistryServer: "https://pkgs.dev.azure.com/AmadeusDigitalAirline/DES-SDKs/_packaging/des-sdks/npm/registry/"
In the package.json of the Otter Demo Application (apps/@otter/demo-app/package.json) you can find the dependency of flight rating SDK:
"dependencies": {
    ...
    "@flight-rating/sdk": "~5.0.0",
    ...
}
This SDK will give you access to an API with 3 operations:
- Add Rating to flight
/**
 * Adds a rating to a flight
 *
 * @param flightId ID of the flight we want to rate
 * @param ratingBody The rating to give to the flight.
 */
public async addRatingToFlight(data: { 'flightId': string, 'ratingBody': RatingBody } ): Promise<Rating>
- Get rating for flight
/**
 * Returns the rating for this flight
 * @param flightId ID of flight to return
 */
public async getRatingForFlight(data: { 'flightId': string } ): Promise<Rating>
- Get ratings for all flights
/**
 * Returns ratings for all known flights
 */
public async getRatings(data: {  } ): Promise<Rating[]>
The main model that we are going to manipulate (named Rating) is the following:
export interface Rating {
  /** A flight ID is composed of [AN2/Airline Code][N1-4 / Flight number] (ie: LH2148) */
  flightId: string;
  /** A rating has a value between 1 and 5. (ie: 4.38) */
  rating: number;
  /** The number of votes */
  votes?: number;
}
The following code has to be modified in the application's AppModule (apps/@otter/demo-app/src/app/app.module.ts):
export function dapiFactory(eventTrackService: EventTrackService): ApiManager {
  ...
  const apiConfig: ApiClient = new ApiFetchClient(
    {
      basePath: 'https://test.airlines.api.amadeus.com/v2',
      requestPlugins: [
        gatewayPlugin,
        clientFactsPlugin,
        new SessionIdRequest()
      ],
      fetchPlugins: [new PerformanceMetricPlugin({
        onMarkComplete: (m: Mark) => eventTrackService.addSDKServerCallMark(m)
      })]
    }
  );

  return new ApiManager(apiConfig, {
    RatingApi: new ApiFetchClient({basePath: 'https://ratings.digitalforairlines.com'}),
    LoggingApi: new ApiFetchClient({basePath: '/api'})
  });
}
Using the Rating API is now very simple: you only need to inject the ApiFactoryService in your components and get the RatingApi:
...
import {ApiFactoryService} from '@o3r/apis-manager';
import {RatingApi} from '@flight-rating/sdk';
...
private ratingApi: RatingApi;
...
constructor(
  ...
  private apiFactoryService: ApiFactoryService
) {
...
  this.ratingApi = this.apiFactoryService.getApi(RatingApi);
}
We will use a generator provided by the Otter framework. You will need to answer a few questions, which will allow to customize your Rating store. The following information will prove useful:
- The store is based on the Rating model. It is available in our @flight-rating/sdk package.
- We want to create a store to collect ratings.
- Since we are going to do HTTP requests to fetch ratings, the store will contain asynchronous actions.
Based on these criteria, you should now create your store using the following command-line, to be run inside your library repository folder (root folder):
yarn ng generate @o3r/core:store
Cheat sheet:
? Which type of store do you want to create ? entity-async
? Skip linter process on generated files? false
? Store name? Ratings
? From which SDK your models come from? (ex: @dapi/sdk) @flight-rating/sdk
? The SDK Model to use as store item (e.g. AirOffer): Rating
? The property name that identifies the model: flightId
You can have a look at the files generated at apps/@otter/demo-app/src/store/ratings, or in the source control tab of VSCode.
Now that our store is ready, we need to integrate it inside our application. Please follow the following steps:
- To register our store in our application, modify the
UpsellModule(apps/@otter/demo-app/src/app/booking/upsell/upsell.module.ts) with:
import { RatingsStoreModule } from '../../../store/ratings/index';;
...
@NgModule({
  imports: [
    ...
    RatingsStoreModule
  ],
  ...
})
- Inside the
UpsellComponent(apps/@otter/demo-app/src/app/booking/upsell/upsell.component.ts), to ensure proper typing, extend the injected store with your definitions. - At the same time, inject the
RatingApiServiceso we can call the rating API.
...
import {ApiFactoryService} from '@o3r/apis-manager';
import {RatingApi} from '@flight-rating/sdk';
import {RatingsStore, setRatingsEntitiesFromApi} from '../../../store/ratings/index';

...
private ratingApi: RatingApi;
...
constructor(
  ...
  private store: Store<AirBoundsStore & AirSearchCriteriaStore & CartStore & AirCalendarStore & RatingsStore>,
  private apiFactoryService: ApiFactoryService
) {
...
  this.ratingApi = this.apiFactoryService.getApi(RatingApi);
}
TIP: If you use your IDE auto-generation for imports, please make sure that the paths are relative to the component, and not to the project root.
Finally, in the same file, dispatch an action setRatingsEntitiesFromApi, providing as call parameter the following method: this.ratingApi.getRatings({})
import {RatingsStore, setRatingsEntitiesFromApi} from '../../../store/ratings/index';
...
ngOnInit() {
  ...
  // Retrieve all ratings from the API.
  this.store.dispatch(
    setRatingsEntitiesFromApi(
      {call: this.ratingApi.getRatings({})}
    )
  );
}
Everything is now in place to see your store in action. First, you will need to compile and launch your application:
yarn start
After compilation, this will create a simple web server on your machine on port 3030. Using your web browser, navigate to the following URL: http://localhost:3030
You should also open your developer tools and select the Redux Dev Tools panel.
Fill the search form, with a city pair such as LON - CDG, one week from now, and navigate to the upsell page by clicking on the search button.
You should see something similar in your redux dev tool panel: 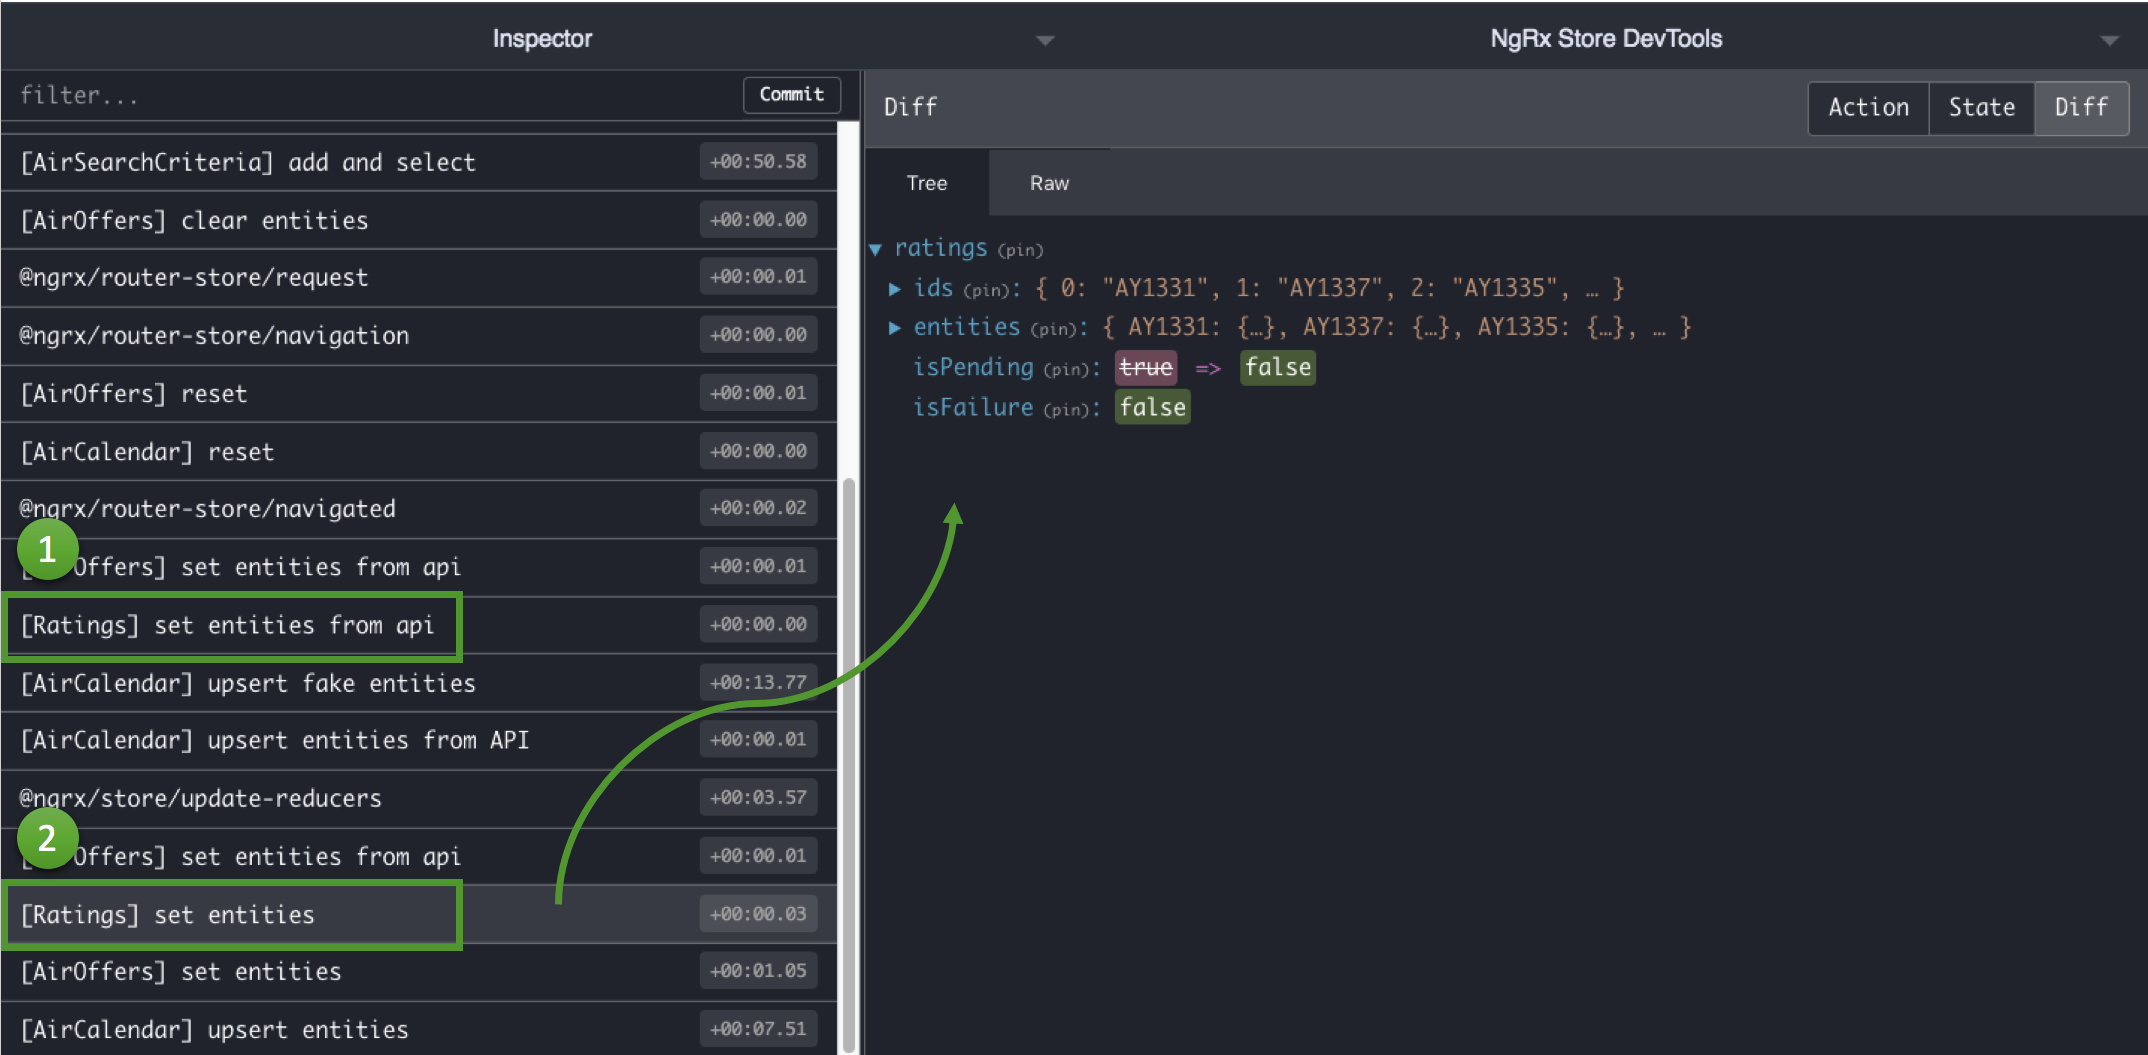 1: The store is set to isPending: true. An effect then runs to monitor the status of the HTTP call to the rating API. Once completed, the action Set Entities is called. 2: And you can see here the result of this Action. The store is not pending anymore, and entities have been filled.
This concludes the store part of the hands-on.
What's in the generated selectors file?
Official selectors documentation
The selectors provide you a way to obtain a slice of store state. You have a few that are already available in the ratings.selectors.ts file. Those are the ‘default' selectors provided as helper by ngrx/store, and we will reuse them to create our custom ones. IMPORTANT: You can't reuse them directly in your component, you need to apply them to the state.
...
const {selectIds, selectEntities, selectAll, selectTotal} = ratingsAdapter.getSelectors();
...
We also provide core selectors in the generator:
...
//First one is just giving you the State of the store, and will be reused to compose all the other selectors
export const selectRatingsState = createFeatureSelector<RatingsState>(RATINGS_STORE_NAME);
...
//Second one, composed by the store state selector, and the selectTotal provided by ngrx :
//StateOfRatingStore + selectTotal = Number of ratings in the RatingStore
export const selectRatingsTotal = createSelector(selectRatingsState, selectTotal);
...
Exercise
Let's create our own selector! To make the things a bit more interesting, we won't create another ‘simple' one. Let's say that we want to get only the Rating object associated to a given flightId.
The goal is to create a selectRatingByFlightId selector, that will be composed of selectRatingsEntities, handle a parameter flightId, and return the RatingModel associated to this flightId.
Answer
Add the following selector to the Ratings store selectors (ratings.selectors.ts)
...
/** Select the rating of a specific flight ID */
export const selectRatingByFlightId = (flightId: string) =>
  createSelector(selectRatingsEntities, (entities) => {
    return entities[flightId];
  });